In this post I want to show you how to implement sequential convoy
messaging pattern in BizTalk 2010 step wise.
- Create a new blank BizTalk project.
- Add a new item Schema name it CustomerInfo (or
any other name you like) and create nodes shown in figure below.
3. Now add another Schema name it PO (shorten for
purchase order) following below image.
4.
Above two schemas will be used for correlation.
Now you need to view the final out put message for that you should have another
schema. I called it FinalSchema. Create its nodes according to screen shot
below.
Roll
up your sleeves the fun starts now. At this point you are able to create the
orchestration. So add a new item (orchestration) to your project and drop
shapes like I have dropped in screenshot.
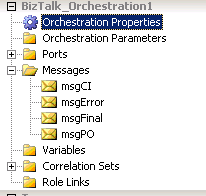
5.
Create four messages according to following table.
Message
|
Type
|
msgCI
|
Schema>>CustomerInfo
|
msgError
|
.NET Type>> String
|
msgFinal
|
Schema>>FinalSchema
|
msgPO
|
Schema>>PO
|
Configuring Shapes:
Assign msgCI to First Receive Shape (Receive_1 according to my screenshot).
- Assign msgPO to Second Receive Shape (Receive_2 according
to my screenshot)
- On left branch Assign msgFinal to the ConstructMessage_1
and on transform create map according to below image.
- Assign msgFinal to Send_1 Shape.
- Add Following Script to the Delay Shape. TimeSpan(hour,minute,seconds)
3.
Assign msgError to ConstructMessage_2 shape.
4.
Add following line in MessageAssignment shape.
1.
Assign msgError to Send_2 shape.
Setting up Correlation:
1.
Promote PONo node from CustomerInfo schema and
PO schema.
2. In Orchestration
view>>Types>>Correlation Types, right click and create new
correlation type. Following Dialogue will be opened up. Here you will see the
property you just have promoted. Add it to right panel.
Note: Correlation will based on the
value of this Promoted Property Node.
3.
Now create a correlation set by right clicking
on Correlation Set and choose New Correlation Set. In properties set
correlation type to the type which we created in last step.
4.
In Receive_1 properties set Initializing
Correlation Set. From drop down choose Correlation Set just created.
5.
In Receive_2 properties set Following
Correlation Set. From drop down choose the only Correlation Set. (See below
Image)
Important: When receive shape will
receive a message (msgCI), it will initialize a correlation set and keep check
the value of PONo node which was promoted and used in correlation set. When the
second Receive shape will receive message (msgPO). BizTalk will match up its
PONo nodes value with msgCI’s PONo nodes value. If both match up it will continue
if not it will suspend those messages (we can handle them in some different way).
Here I have just left as this is a sample.
Adding Ports:
6.
Add a receive port and attach it to Receive_1
shape.
7. Add Operation to the same receive port and
configure it with PO schema and attach it to Receive_2 shape.
8.
Add two Send ports and attach them to Send_1 and
Send_2 shapes.
Configuration on Administration side:
- Create One Receive port with two Receive Locations ( One will pick up CustomerInformation message and the other will pick up PurchaseOrder message).
- Create two Send ports (One to output Final message and other to output Error message).
- Bind them to the orchestration and start the project.
Drop sample file in Customer Info IN folder and wait for 5 second you will get error message in error folder. If you put Purchase Order message within 5 second in PO IN folder you will get Final message in Output folder.